

Hi dear Foodaciously reader!
If you want to step in the wonderful world of baking but you’re not sure where to start, then these simple baking tips and tricks are definitely the basics that every baker needs to know.
We also dedicate this post to the more seasoned bakers who may want to get a refresher or learn a few new tricks.
These foundational rules apply to any baked goods like cakes, cookies, and pastries.
If you follow us through these essential baking tips, we will share a bit of our knowledge and experience and show you how fun and easy baking is!
Like anything in life, baking is a skill you can acquire through patience and dedication. Mistakes happen and they are proof you are trying. But if you have passion and drive, success is in your hands!
Are you ready to learn how to become a better baker? Let’s go!
#1 Planning & Preparation

Get to Know the Recipe
It might seem obvious to you, but if you want to bake anything you need to plan in advance.
Once you have decided what to bake, it’s a good idea to compare different recipes and find the one that best suits your tastes, dietary requirements, and ingredients availability. You can use our smart search system to easily filter all our recipes according to your diet and allergens needs.
Read carefully and thoroughly the recipe to be sure you know which are the crucial steps in the process and what lays ahead in terms of time management.
Make sure you have all the right ingredients or their substitutes and that they are at the right temperature. For example, is the recipe asking for melted butter or softened butter? If you know this in advance, you can get your ingredients ready and, you won't have to worry about these details later on.
Finally, by reading the recipe you become more aware of which tools and equipment you’ll need. How many times did you find yourself short of clean bowls while cooking? Enough postponing, unload that dishwasher before you start baking!!
To sum up, getting to know your recipe in advance allows an efficient planning which is key for successful baking.
Create an Assembly Line for Tools and Ingredients
Through our baking experience, we have realized how much of a big difference the following rule can make. At first you may think we are being excessive but with time, you'll cherish the resulting order and peace of mind.
Always neatly prepare all the ingredients and utensils in a fast assembly line from bench to oven to complete the recipes without mistakes and delays. If the recipe calls for a set of tools make sure they are already on the kitchen counter.
If you want to take this advice a step further, it’s a good idea to line out the ingredients in the same sequence as the order in which you will use them in the recipe. By doing so, you are sure you won’t skip any step or miss any ingredients. Trust us, when you are focused on getting the perfect chocolate ganache your mind can blank out!
Because we know just how distracting our environment can be nowadays, we designed our recipe page to have each step clearly contained in a numbered card and we have the ingredients tab follow you as you go through the recipe. As you complete a step, just mark it the card as ‘done’ and the used ingredients are automatically struck off. This way we help you keep track of where you are or where you left off if you got distracted by a call or an email. How cool is that 🤩?
Let’s move on with our baking tips and tricks list!
Be Oven-Ready
As the last step of any baking recipe approaches, it’s important to get the cake or cookies in the oven as soon as possible.
Preparing the tins and baking trays before you start the recipe will prevent you from wasting time and potentially compromising the result.
In fact, if you allow the dough to sit on the counter for too long before putting it in the oven, the baking powder loses its leavening power, or the foamy batter deflates leaving you with a flat and dense final product.
Therefore, always remember to grease and flour the baking tin, to line the trays with parchment paper, and to prepare the muffin cases according to recipe instructions before you start the recipe. You can skip the parchment paper or excessive greasing if you have non-stick trays or tins.
Last, but not least, preheat the oven to the right temperature as soon as you start the recipe. Find out why in the next section!
#2 Temperature Matters

By now you have learned how important it is to know the recipe and plan its execution in advance, so let’s move onto the next baking tips.
In this section, we’ll explain why temperature is the most essential element in baking and how it is relevant throughout the baking process.
How Does the Temperature of Ingredients Affect Baking
You may have asked yourself: does ingredients temperature matter? Well, the answer is yes, and it makes all the difference.
Believe it or not, there is a science behind every baked good where the laws of chemistry and physics come together to give you those delicious golden cookies and spongy cakes.
One of these laws is temperature, and by that, we mean:
The ingredients have to be at the right temperature before you start. Our recipes tell you which is the best one for each ingredient, in particular for liquids and fats such as eggs, milk, and butter.
The most common temperature for baking ingredients is the room the temperature which is 25°C or 77°F. However, this is subject to many variables that come in play in your kitchen, like the season, ventilation and humidity.
The Temperature of Butter
According to the product and the desired results, you can use butter at three different temperatures, chilled, softened, or melted.
Room Temperature Butter / Softened Butter. Butter at room temperature is bent and deformed easily when pressed with your fingertips.
When should you use room temperature butter? Softened butter when mixed with sugar, traps air inside the mix, making the whole batter lighter and fluffier.
Cold Butter / Chilled Butter. Butter cool from the fridge is useful to get crispier bakes. Let's take cookies for example. Cool butter gives you crispy and friable cookies, while liquid butter makes your biscuits chewy and malleable, like Starbucks'.
Melted Butter. It is used for those recipes which require liquid fat. For example, bars and chewy cookies.
The Temperature of Eggs
Eggs are an essential ingredient in baking and the recipe might ask for cold or room temperature eggs.
Room Temperature Eggs. In most cases, recipes call for these eggs as they are more easily incorporated into batters and don’t curdle. Here are a few example of when to use room temperature eggs.
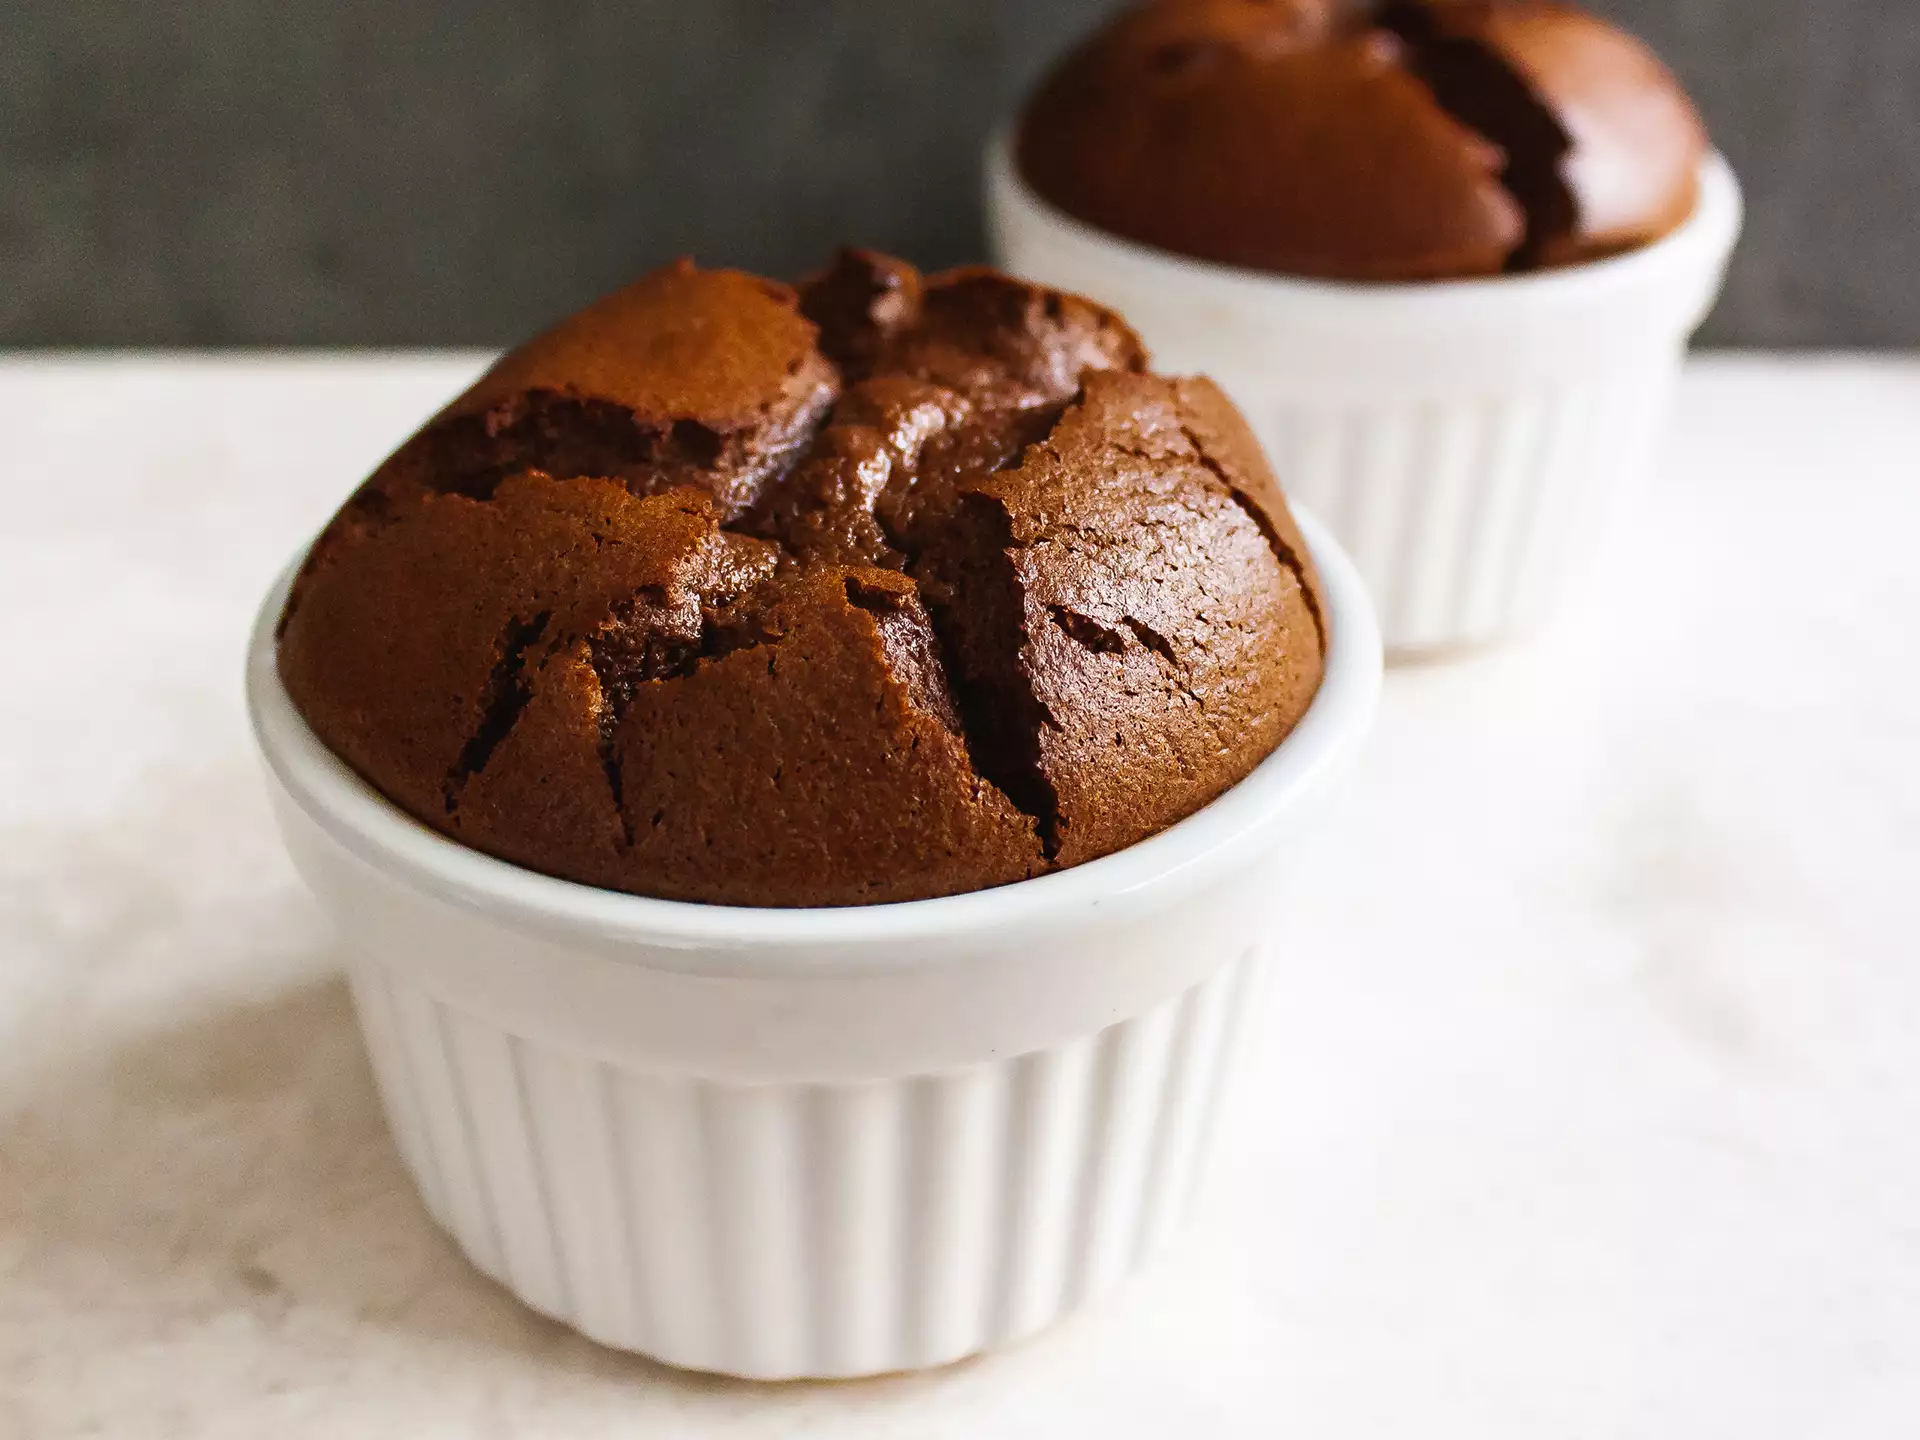
Airy Batters: The secret to getting airy batters is in the whipping of the eggs. Whipping cold eggs results in dense batters. Room temperature eggs instead significantly increase their volume when whipped resulting in high and soft bakes.
Examples of recipes that require airy batters include the high soufflé and sponge cakes.
![Gluten Free and Dairy Free Chocolate Soufflé]() Dairy Free Chocolate Soufflé
Dairy Free Chocolate SouffléHigh-Fat Batters: Some recipe require batters that are high in fat. These recipes rely on room temperature eggs, because the cold ones can cause the fatty elements to harden, curdle and form lumps.
A good example of a recipe needing fatty batter is the cheesecake.
To bring eggs to room temperature, just take them out of the fridge and allow to sit on the kitchen counter to warm up for 30 to 60 minutes. Alternatively, place them in a bowl of lukewarm water for 10 to 20 minutes.
Cold Eggs. There are times when using cold eggs is a good idea. Here are a few examples:
Separating Eggs: if you need to separate the egg white from the yolk, do it when the eggs are cold as the two phases are firm and won’t crack one into the other.
Cookie Dough: cold eggs help to keep the dough firm and prevent spreading of the biscuits when baking.
Hopefully, by now you have learned that time spent on bringing the ingredients to the right temperature is well worth the effort to improve your baking!
Want better Cookies? Use Chilled Cookie Dough
A good trick for cookie enthusiasts is to refrigerate the cookie dough before baking. Why? Because it solidifies the fats, allowing them to melt more slowly when cooking, which helps preserving that perfect cookie shape.
Also, as the dough chills in the fridge, it dries out allowing the sugar to absorb the liquids and to become more flavourful. All this results in perfectly shaped, tasty, and golden cookies!
Just roll the dough into a ball and wrap it in cling film or transfer into a bowl and cover with a clean cloth. Then keep in the fridge for at least 15 minutes. The longer you allow the dough to cool down, the better.

A good idea is to let the dough cool for 15 minutes, then quickly cut cookie shapes out of it and put the cookies back in the fridge for another 15 minutes.
Why is it Important to Preheat the Oven, Always
If you are asking yourself ‘do I really have to preheat the oven?’, the answer is Yes. This is probably the most essential baking tip that many beginners often overlook. As already mentioned above, make sure that the oven is at the right temperature before you place any product in.
Allow at least 15 to 20 minutes to preheat the oven and always follow the temperature specified by the recipe. If you turn the oven on just before you prepare the recipe you’ll have plenty of time to heat it properly.
Chemical leaveners like baking powder and baking soda not only require heat but a particular temperature to activate. If the oven is not at the right one, you won’t get an optimal rise for the finished product.
Also, a well-heated oven guarantees a faster cooking, a better texture and a lovely browning of the baked goods. This way, you’ll get those crunchy cookies and golden cakes you love so much!
Don’t open the oven door while the goods are baking as you’ll cause heat to escape compromising the rising of the cake. It may be tempting to have a sneak peek at what you are cooking, especially when you can’t see well through a stained oven glass door. But don’t open that door!
Oven Temperatures
Different recipes call for different oven temperatures and they depend both on which oven you use and what you are baking.
A static oven is good for items that require rising and a dry texture, like cakes. However, as this oven doesn't allow air to circulate, you get the disadvantage of cooler and hotter areas and the limitation of cooking only one batch at a time in the middle shelf.
In fan-assisted ovens, the temperature is even throughout so they are hotter and cook faster. They are good for baking crispy and crunchy products like biscuits and pastry. Unlike static ovens, they also allow you to bake goods on multiple shelves, which is very handy when you have more trays of cookies to bake.
Useful Tip: If the recipe provides the oven temperature for the static oven and you are using a convection/fan oven, then decrease the temperature by 20°C (68°F) or reduce the baking time.
Getting an accurate reading of the actual temperature inside the oven can make a big difference. Therefore, a good investment is to buy an oven thermometer. Nowadays, they as are quite cheap and easy to fit, helping you to get the best results for any bakes.
As mention above, there is another factor to consider when dealing with oven temperatures. Different baked goods like cookies, pastries, and cakes require different temperatures which are optimal for that product.
A good rule of thumb is that:
Crispy and golden bakes like cookies and pastry require a higher temperature, from 170°C to 190°C.
Fluffy and spongy items like cakes and muffins require a lower temperature, from 150°C to 170°C.
Anyway, always refer to the recipe instructions when in doubt!
Finally, remember that recipes from different countries might have different unit systems to express temperature. In particular, we distinguish between the Celsius (°C) scale and Fahrenheit (°F) scale, which is used in the United States.
Best thing to do when converting is to check on Google, as the conversion formula is not particularly memorable.
Why Do You Need a Cooling Rack
The job of a baker seldom ends when taking the product out of the oven, as there is often plenty of work ahead, like transforming a simple sponge cake into a glorious three layers frosted cake. However, before proceeding to slice, ice or decorate your glorious creation, you have to let it cool down.
Place your baked item on a wire rack to let air circulate all around it evenly and quickly. Cookies will become crispier and cakes will not crumble or lose their shape when cutting or decorating. Doing so also prevents overcooking the bottom of the product with the residual heat from their cooking tray.
So if there is something that every baker should have, that is a cooling rack. They come in many variations but we recommend a stackable wire rack to cool down more items at a time. You’ll be unstoppable!
#3 Know your Ingredients

Even if cakes, pastries, and cookies come in thousands of variations and flavors, they all share the same basic ingredients.
There are essential ingredients that every baker should have; using them in different ratios and qualities will then yield a wide range of products.
Try to always use the best quality ingredients you can find or afford as they can really make a difference in terms of flavor and texture.
Now, let’s see together which are the essential baking ingredients to have and how they work.
Thickeners
Flour is the most important ingredient in baking as it provides the base for any baked good. Flour acts as a thickener and contains a protein called gluten. Although some folks are allergic to it, gluten plays a really important role in baking: the protein molecules stretch and form a lattice which helps to hold and build the structure, form, and shape of cakes and biscuits.
Gluten in cakes and biscuits should be present in moderation. The higher the content of gluten, the stronger the flour. The stronger the flour, the tougher the cooked dough is going to be.
That's why you use strong flour for bread, which contains a lot of gluten. We'll talk more about the types of flours in the section below!
Remember to store the flour in an airtight container away from products with strong aromas.
A note to our dear readers with gluten allergies. We built our site to help everyone find their favourite recipes, including folks with allergies. You can find gluten-free recipes using our Smart Search.
All-Purpose Flour
As the name implies, all-purpose flour is suitable for almost any baking. It is easy to find and comes at hand for any recipe, also savory ones. This flour contains a combination of high gluten bread flour and low-gluten cake flour.
It is the basic flour that every beginner baker should have as it is light and fluffy, perfect for any basic cake and cookie. If you are allergic to gluten, then check how to replace all-purpose flour with gluten free alternatives below.
Other Flours
There are other types of flour as well and these include:
Self-raising Flour: plain flour mixed with baking powder and salt; ideal for high-rise products like cakes. You can easily make your own self-raising flour without having to buy it at the store as you already have all the ingredients in your pantry. Just add two teaspoons of baking powder for every cup of flour, mix well and add a pinch of salt. That’s it!
Wholemeal Flour: this flour keeps the wheat germ and bran. You can use it to replace part of or all the plain flour in your recipe to make it healthier, thanks to its high fiber content. However, keep in mind it affects the overall texture of the product as it is heavier and denser. Therefore, tweak the other ingredients to get a ligther finished product. For example, in these delicious muffins recipe, carrots give moisture to a batter made with wholemeal flour, making it softer overall.
![Dairy Free Carrot and Oat Muffins]() Dairy Free Carrot and Oat Muffins
Dairy Free Carrot and Oat MuffinsGluten-free Flours: there are many great replacements to the traditional wheat flour. They are made from other milled cereals like oat, rye, and rice or from grounded nuts like almonds. Beside their health benefits, they also give cakes and biscuits a very distinctive flavor and texture, but again be careful about how you add them. Here is a great cake made only with oat flour where we talk more on how to adjust the other ingredients to get the best results.
![Gluten Free Italian Pear Cake with Honey Glaze Recipe]() Gluten Free Italian Pear Cake with Honey Glaze
Gluten Free Italian Pear Cake with Honey GlazeCorn or Potato Starch: They are mostly not used as a replacement for flour, but rather as an addition to flour. In fact, thanks to their light consistency they are excellent choices to make soft and spongy cakes and muffins. As the starch can also absorb liquid, they help to make moist cakes less soggy and greasy. If you want to get this benefits, try replacing 1/4 of the flour requirement with starch.


Chemical Leaveners
Chemical leaveners react with moisture and heat to give off carbon dioxide, a gas that allows a cake to expand and rise. In fact, air bubbles are released in the batter adding a lovely lightness to the final product.
According to their components and how they are activated, we distinguish between:
Baking Powder: to work it requires moisture and heat. The former comes from the liquid found in the batter like milk while the latter from the heat of the oven. This is why it’s so crucial that you cook the cake as soon as possible after you have added the baking powder and that the oven is already at the right temperature for the leavener to activate.
Baking Soda: it is nothing more than sodium bicarbonate, an alkaline chemical that requires an acid like yogurt, lemon juice, sugar, or cream of tartar to activate. Usually, you require one or two pinches of baking soda as adding too much can give an unpleasant metallic taste to the product. As it is a tricky ingredient to use, it’s often easier to use baking powder which yields more sure results.
Remember to sift and mix chemical leaveners with flour to distribute them evenly and then add a pinch of salt.
Fats
When baking, fats are useful to get tender and lighter products as they slow down gluten formation. In addition, they are essential to give moisture, flavour, and texture to any bakes.
Fats include butter, yogurt, and vegetable oils and we can broadly categorize them as either vegetable fats or animal fats. Let's look a bit more into them to understand their properties when it comes to baking.
Animal Fats
Butter is the most used fat derived from animal sources and it can be regarded as the king of fats in baking. In fact, it is a versatile ingredient that gives a unique flavour and an extremely fluffy texture to any product.
In addition to butter, recipes can also include other dairy products as milk, yogurt, cream, and soft cheese as they still have a high amount of fats.
In classic baking, animal fats tend to be used over the vegetable fats because they are more flavourful and yield softer dough, as well as because of culinary tradition. However, animal fats have more saturated fats than their veggie counterparts, so they could broadly be considered as less healthy, but this argument would require more elaboration, which is outside the scope of this article.
A good reason not to use these fats, outside of personal preference or beliefs, is because of diary allergies. As mentioned before, if you are after dairy free recipes, don't forget to check our free to use smart search.
Vegetable Fats
Common fats derived from plant-based sources include extra virgin olive oil, coconut oil, margarine, and vegetable oils.
Vegetable oil is a rather broad term, as there are many sub-types of oils, such as rapeseed, sunflower, and peanut oil, among others. Most of the time, when you buy "vegetable oil" you are getting a blend of various plant oils. Always check the label to make sure you are not getting some oil you don't like!
With so many to choose from, it can be difficult to select the best one for a given recipe. If a recipe indicates a specific type of vegetable fat and you don't have a personal preference against it, you should stick to the suggested one. But let us give you some further insight into the types we mentioned, to help you make a more informed decision.
Extra Virgin Olive Oil: it is regarded as the healthiest oil due to the low amount of saturated fats and a high amount of unsaturated ones.
It can be used in a variety of recipes but keep in mind that it has quite a strong flavour that doesn't always go well with the sweetness of baked products.
Although this doesn't apply to most forms of baking, we'll throw this tip in just in case, because it's very important: do not fry with extra virgin olive oil. This oil has a low smoke point, which means that it burns at lower temperatures than oils with higher smoke point.
Coconut Oil: unlike olive oil, it is higher in saturated fats but scientific studies have shown that it doesn't increase the levels of bad cholesterol as previously thought.
Nowadays, it's often used a butter replacement in many vegan recipes and it also adds a distinctive flavour. According to the storage temperature it can be used as a liquid or a solid ingredient and thus it's a very versatile type of fat. Just know that it will give coconut flavour to your recipe. If you don't fancy that, you'll have to use a different vegetable oil.
Margarine: it is made with vegetable oils processed to stay solid at room temperature. Margarine can be a substitute for butter as it has a very similar consistency. However, the solidification process often leads to a product which is not as healthy and natural as other fats.
Vegetable Oils: they are a good choice if you are looking for a neutral flavour and a moist texture. As mentioned above there are different types and you can choose the one that best suits your preferences. The general problem with these oils compared to extra virgin olive oil is that they tend to be heavily processed. If you have time to browse the store shelf, look for oil that are cold pressed for a healthier bake. If you haven't tried, you may give Canola Oil a go as it has better than average health properties.
When replacing butter with vegetable fats in your recipe, you should usually use a 1:1 ratio or reduce to a 3:4 ratio.
Sweeteners
Sweeteners soften the gluten and make products crispier.
They are also responsible for that typical golden color of baked products and add a unique caramelized flavor and a delicious aroma.
There are different sweeteners:
Granulated Sugar: is the regular sugar where the molasses has been removed and further refinements have transformed the original product into white sugar. If you don't overly mind about the color of the final product, consider using organic brown sugar for a less refined alternative.
Icing Sugar: also known as confectioner’s sugar or powdered sugar is made by ultra-fine sugar crystals and is used for frosting and icing. Did you know that you can make icing sugar at home? You just need a good blender, normal white sugar and a bit of starch. Blend everything together until you get a fine powder.
Brown Sugar: it has a high molasses content and a distinctive flavor, but it’s moister than regular sugar and can alter the color of the baked products to a more brownish shade. If you are using natural colorants, such as cocoa powder, there's no advantage in using white sugar over the brown one.
Sugar Substitutes: they include honey, maple syrup, and agave syrup. They are a great and healthy alternative to refined sweeteners and also add a unique flavor to the products. Try our delicious cake made with honey to taste the difference.
Binders
Eggs are the most known and used binders in baking. They work by holding together the other ingredients when mixing and cooking. In addition, the eggs solidify when cooked so they help keeping everything firm.
When beaten they add lightness to the batter and they give the cake more richness and depth of flavor as they also contain fats.
Eggs Replacement
For dietary reasons, personal preference, or just to experiment with new ingredients, you can replace eggs with other products that yield similar results.
Common eggs replacements are:
Chia Seeds: to discover more on how to use chia seeds as egg replacement have a look at our tasty Vegan Brownies.
‘Flax’ Eggs: to make this egg substitute just combine one tablespoon ground flaxseeds with three tablespoons of water and let sit in your fridge for 20 minutes to thicken.
Mashed Banana: use one ripe mashed medium sized banana for every egg that you want to replace.

#4 Weight and Measure with Accuracy

When it comes to baking, never estimate the amount of the ingredients but measure and weight each of them carefully.
Using the correct measurement technique will make a big difference in the final results, like the texture of biscuits or the rise of a cake.
After all, as we have already seen with the properties of the ingredients, baking can be considered a real science!
Different Ways to Measure
In baking, there are mainly two ways to measure: by weight and by volume.
Personally, we believe that measuring my weight is more accurate than measuring by volume, but this last technique is very common, especially in countries like the United States, and thus it has to be at least understood properly.
Here are a few easy to remember general tips when it comes to measuring ingredients:
Never pack down the flour when measuring by volume or you’ll end up with a much higher amount in your recipe.
If you are using brown sugar, keep in mind it’s less dense than normal white sugar so you have to lightly press it down when measuring it by volume, or simply use a bit less than instructed.
Always sift the flour, cacao, and icing sugar after measuring them to avoid lumps in the batter or dough.
Measure by Weight
To measure by weight, you need a scale, a digital one would be ideal as it gives you precise readings down to the decimals.
Remember to tare it before you measure and consider the weight of the cup, plate or glass that holds the ingredient.
Measure by Volume
When you measure by volume, you are actually measuring how space the ingredient occupies in a defined "container". Therefore, for this technique, you need specific tools.
Let’s see together which are they and what are they used for.
Measuring spoons for ingredients used in small quantities like baking powder and spices.
Measuring cup for liquid ingredients like milk, water, and oil.
Measuring cup for dry ingredients like flour, sugar and cocoa powder. Use the ‘spoon and level’ technique where you lightly spoon the ingredient into the measuring cup, without packing it, until it is overflowing and then level the top with a knife
Remember to always sift the flour, cacao, and icing sugar after measuring them to avoid lumps in the batter or dough.
Unit Conversions
Different countries use different units to express weight and these include the imperial and metric unit systems.
Choose your favorite unit and then stick with it ensuring that all the ingredients have the same one. In our recipes, you easily toggle between the two systems in the ingredients tab to meet your preferences and ensure a fast workflow.
All of our recipes make it super easy to switch between measuring units. There's a toggle between Metric and Imperial system in the ingredients tab. How awesome is that? Say bye bye to those annoying calculators!
#5 Don't Rush and Follow the Steps

Now that you have learned so much about baking thanks to our tips and tricks it's time for one last recommendation and that is to not rush through the baking process.
Think about how every action and ingredient can affect the final result of your baked goods.
Not skipping the recipe steps and allocating the right time to each of them will make you bake like a pro.
For example, if it takes 5 minutes to cream the butter and eggs, make sure you respect this time. The ingredients have to blend, bind and react. In fact, air has to be incorporated properly and this doesn’t happen over a few seconds.
So here are our best baking tips to make sure each step is followed and not rushed through:
Add one egg at a time to the fats like butter and oil to allow the mixture to thicken and emulsify.
Alternate wet and dry ingredients to avoid a thick or saturated batter or to prevent the separation of the ingredients that results from over mixing.
Cook in the middle shelf, one batch at a time if you are using a static oven. This will ensure the dough is equally distant from all sides of the oven, which are usually hotter, resulting in an even distribution of heat over the whole product.
Keep the oven door closed to avoid heat loss that would compromise the final result. Do not open the oven door during cooking as the cold air may affect the rising of the product.
Check the cake only after cooking time inserting a skewer in the middle. If it comes out clean, the cake is ready.
Congratulations, you are at the end of our baking guide to improve your skills! We would like to thank you for staying with us ❤️.
We hope you have enjoyed this article and learned something new to start as a baker or just become a better one. And if you did, just share this post with your fellow bakers on your favourite social media 😉.
Practice and passion are all you need to prepare amazing cakes, pies, and cookies to enjoy with family and friends. And what matter is that you have fun in every single step and flavor the joy of baking!
Now, go and bake something awesome! 😀👋
